Category: Uncategorized

  • How to Specify Logo Embroidery on Custom Scrubs: Placement, Size, and File Specs

    How to Specify Logo Embroidery on Custom Scrubs: Placement, Size, and File Specs

    A logo on a scrub top has a hard job. It has to read across a busy exam room, survive dozens of hot industrial wash cycles without puckering or fraying, and sit somewhere a clipped ID badge will not cover it. Settle the placement, size, and artwork before the order reaches production and the same file will reorder cleanly for years. Leave them vague and you find out what went wrong only after a sealed box of finished tops arrives. This is a practical walkthrough of the specifications a decorator actually needs from you, and the reasoning behind each number.

    The order matters: decide where the mark lives, then how big it is, then how the file is built. Working in that sequence keeps you from sizing a logo that will not fit the space you eventually choose.

    Start with placement, not the logo

    The left chest is the default placement on scrubs, and it earns that spot. It stays visible while a clinician leans over a patient, it reads in a headshot or a hallway, and it clears the center of the collar where most staff clip an ID badge. Put a logo dead center and half the time a lanyard or badge reel hides it. The pocket is the other constraint. Many scrub tops carry a chest pocket exactly where a left-chest logo wants to go, so confirm whether your mark sits above the pocket seam or on the opposite side before you commit.

    Secondary placements each answer a different need. A small icon on the sleeve reads as a modern, understated touch and works when the chest is already busy. A wider mark across the back yoke, just below the collar, is where a clinic name, department, or website belongs because it has room for legible text at a distance. Personalized names and titles usually sit directly under the left-chest logo, or balanced on the right chest, in a clean block font that holds up in thread.

    Size it for legibility, then for the garment

    A left-chest logo generally lands between 3.5 and 4 inches wide. The quickest gut check is to hold a credit card horizontally against the chest of a top: that width is close to right. Push much below 3 inches and fine detail starts to close up and text turns to mush once it is stitched. Circular marks tend to run a little smaller, around 2.5 inches, simply because a circle fills more of its bounding box than a wordmark does. Sleeve icons sit in the 3 to 3.75 inch range, and a back-yoke treatment for a clinic name typically spans 10 to 14 inches so the text carries across a room.

    The single most useful rule concerns text: any lettering in the design should be at least a quarter inch tall in the finished stitch-out. Thread has a minimum feature size, and letters below that height lose their counters and gaps. If your logo includes a tagline or a long clinic name that would fall under a quarter inch at 3.5 inches wide, that is a signal to drop the tagline from the chest version and reserve it for the larger back placement.
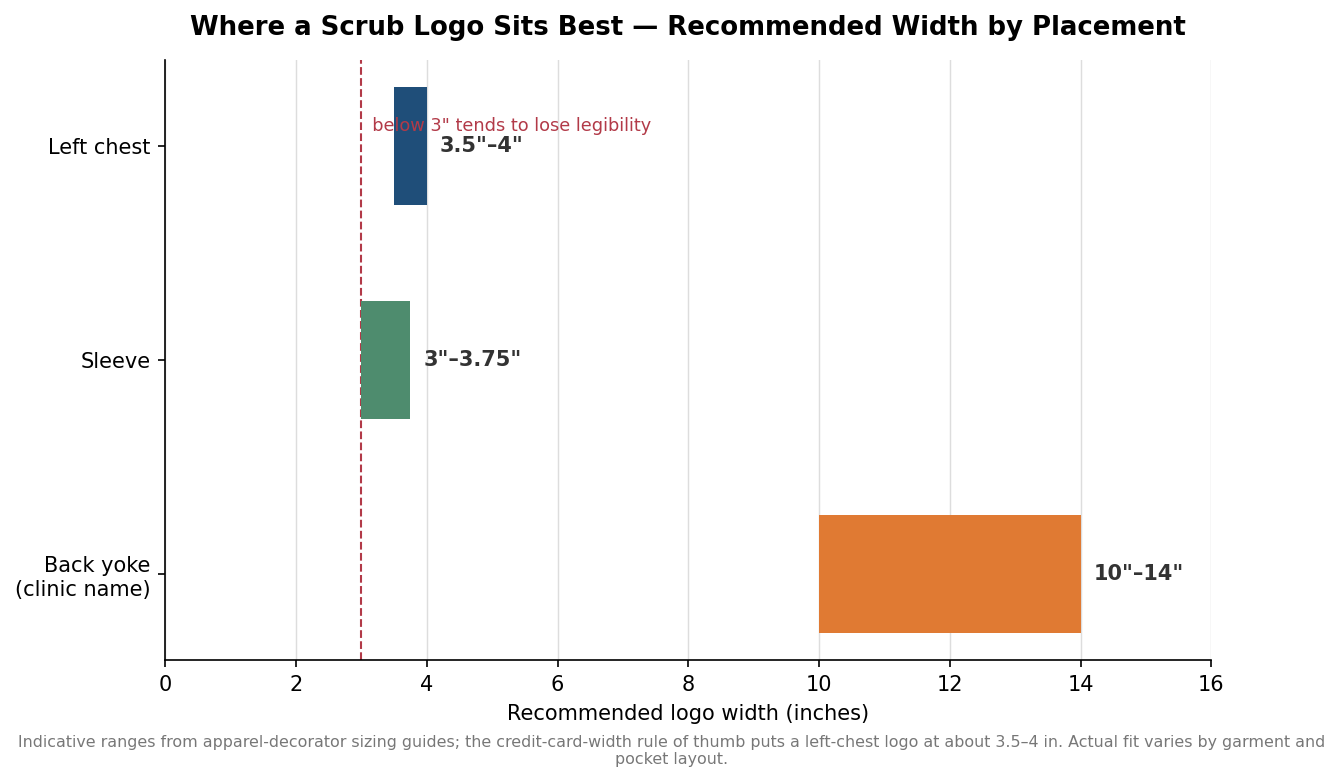
    Horizontal bar chart of recommended embroidery logo width by placement on scrubs: left chest 3.5 to 4 inches, sleeve 3 to 3.75 inches, back yoke 10 to 14 inches.
    Left-chest logos read best at roughly credit-card width; text below a quarter inch tall tends to close up in thread.

    Get the artwork into an embroidery-ready format

    Embroidery does not read your logo the way a printer does. A machine follows a stitch file, so the artwork has to be converted first, and the quality of that conversion decides how the mark looks. Send vector artwork whenever possible: an AI, EPS, or SVG file scales without blurring and gives the digitizer clean edges to follow. A JPG or PNG can be used, but it usually needs to be cleaned up or redrawn first, which adds time. What you should never assume is that handing over a print-ready logo is the same as handing over an embroidery-ready one.

    Digitizing is the step that turns that vector art into machine instructions. A digitizer assigns stitch types, satin stitches for borders and lettering, fill stitches for solid areas, running stitches for fine lines, then adds underlay to stabilize the fabric and pull compensation so the design does not distort as the thread tensions. This is also where design choices get enforced by physics. Gradients and subtle color fades cannot be reproduced in thread and must be simplified into solid color blocks, and very small elements often have to be enlarged or dropped. The common machine file, DST, was developed by Tajima and runs on virtually every commercial embroidery machine, but it carries no thread color information, so you should supply your thread color callouts separately rather than assuming they travel with the file.

    Understand stitch count, setup cost, and turnaround

    Stitch count is the hidden variable behind both price and schedule. A left-chest logo of 3 to 4 inches typically runs somewhere between 5,000 and 12,000 stitches depending on how much solid fill it contains. Scale that same design up to a 10 to 14 inch back and it can climb to 40,000 to 80,000 stitches, because density grows with area. More stitches mean longer machine runtime per piece, and every additional thread color adds a color change that slows the run further, which is why a simplified two or three color mark is cheaper to produce at volume than a busy one.

    Digitizing is a one-time setup cost, not a per-piece charge. Expect it to fall roughly in the 15 to 30 dollar range for a straightforward left-chest logo and 50 to 100 dollars for a large back design, with the exact figure depending on complexity. Once a design is digitized, the file is kept on record, so reorders skip that fee entirely. Digitizing itself usually turns around within 24 to 48 hours, which matters when you are planning a launch date; it is the production run, not the file prep, that drives your real lead time.
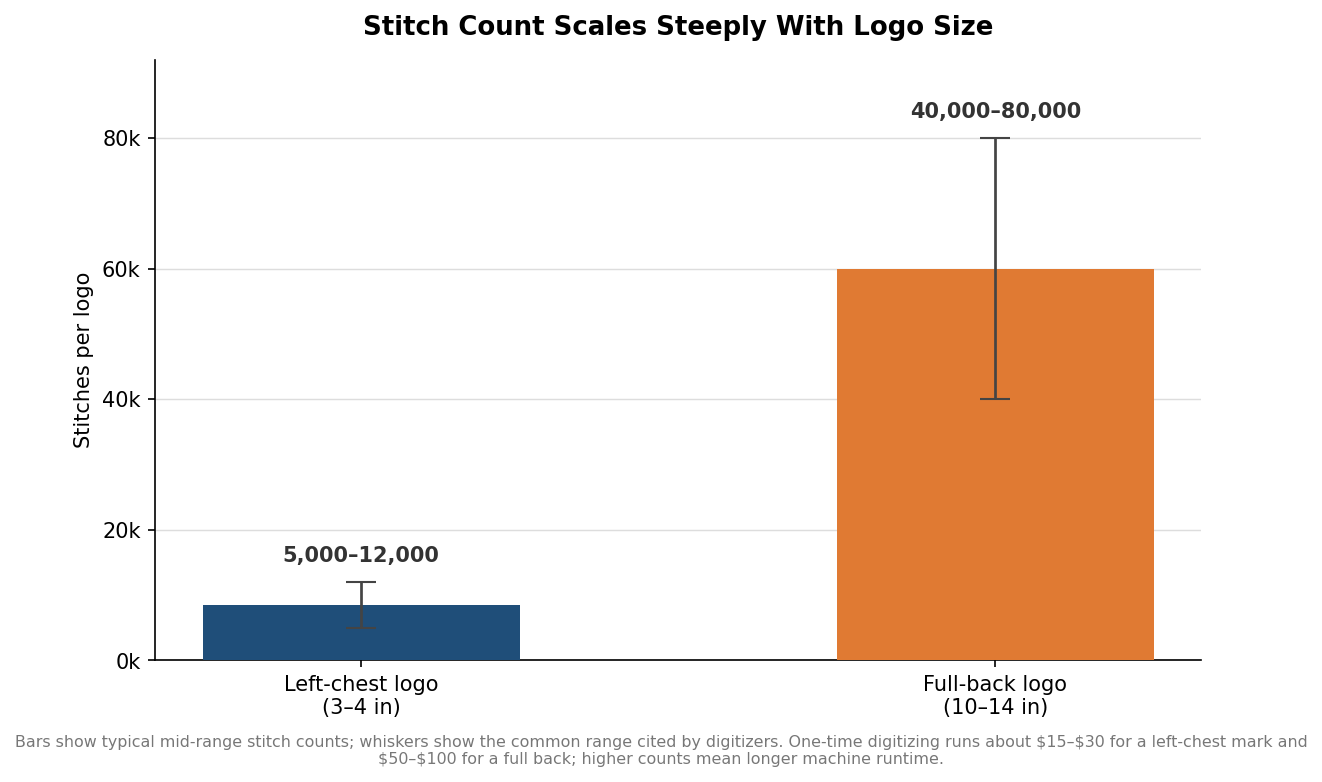
    Bar chart comparing typical stitch counts: a left-chest logo runs 5,000 to 12,000 stitches while a full-back logo runs 40,000 to 80,000.
    Stitch count, and therefore machine runtime, scales steeply with logo size; digitizing is a one-time setup cost that reorders reuse.

    Fabric and the last checks before you commit

    The garment underneath decides how clean the stitching looks. A polyester-cotton blend with a tight, stable weave is the friendliest foundation because it holds the stitches without shifting. Very lightweight or highly stretchy performance fabrics are more prone to puckering around a dense design, so they lean harder on proper stabilizer and a digitizer who accounts for the stretch. Whatever the fabric, the color of the actual garment changes how thread reads, so a navy logo that looks sharp on white can disappear on a dark top.

    Before you approve a full run, ask for a sewn sample, a physical stitch-out on the same garment and color you are buying, not just a digital proof. It is the only way to catch a letter that closed up or a color that vanished while it is still cheap to fix. Note the digitized file identifier your decorator assigns, keep it with your brand assets, and reorders will match the first batch exactly. In short, hand your decorator vector artwork, a chosen placement, a finished width in inches, your thread colors, and the specific garment, and most of the ways a scrub logo goes wrong are closed off before the machine ever starts.
  • Scrub Color Policy: How to Assign Colors by Role in Your Practice

    Scrub Color Policy: How to Assign Colors by Role in Your Practice

    When a practice decides to standardize its scrubs, the fabric and the embroidery get all the attention, but the decision that patients and staff actually notice every day is color. Assign colors well and a walk down the hallway tells you who is a nurse, who is a surgeon, and who to ask for help. Assign them carelessly and you have spent a uniform budget on confusion. This is a guide to building a scrub color policy that works, starting from an uncomfortable fact: almost none of it is standardized for you.

    There is no national scrub color code

    It is tempting to assume hospitals share a color system the way road signs share shapes. They do not. Color assignments vary from one facility to the next, and beyond a couple of loose conventions there is no governing standard telling you that a given color means a given role. That is not a problem to solve so much as a reality to design around. It means your practice gets to define its own scheme, but it also means you cannot assume a new hire arrives already knowing what your colors mean. The policy has to be explicit, written down, and taught.

    The one place a stronger convention exists is the operating room, where surgical staff have long worn green or blue. The reason is optical rather than arbitrary: staring at red tissue for hours creates a green afterimage, and green or blue-green scrubs sit opposite red on the color wheel, which reduces that visual fatigue and helps surgeons distinguish subtle shade differences. Outside the OR, the meanings get softer fast, and even the familiar blue-for-nurses and white-for-doctors pairings are conventions rather than rules that any two hospitals are guaranteed to share.

    The conventions people actually expect

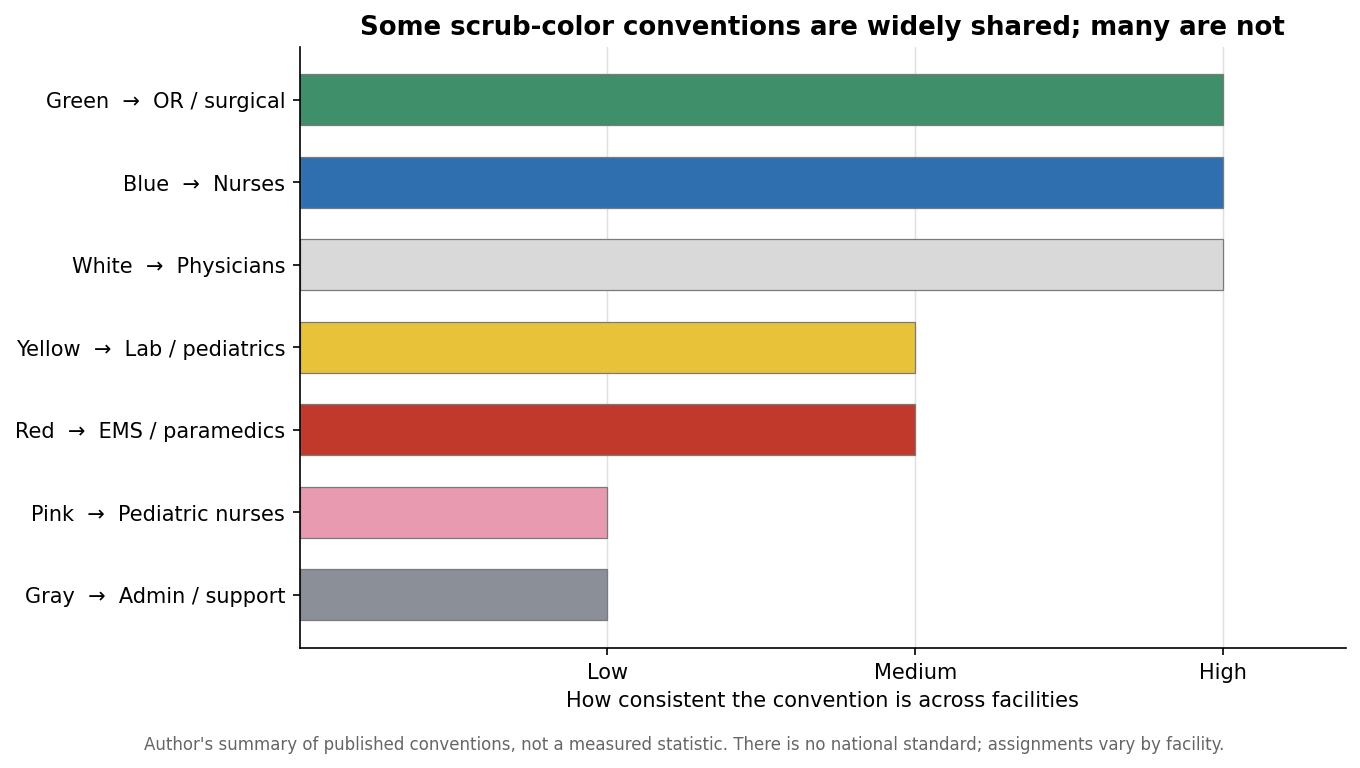
    Even without a standard, some associations are common enough that patients half-expect them, and it is worth knowing which ones carry weight before you assign against them. A few pairings show up almost everywhere; many others are genuinely a coin flip between facilities.

    Horizontal bar chart showing how consistent common scrub color-to-role conventions are, from white/physicians and blue/nurses (high) to gray and pink (low)
    A few scrub-color conventions are widely shared; most vary by facility.

    The practical lesson is to lean on the strong conventions and treat the weak ones as free choices. Putting your nurses in blue and your surgical team in green costs nothing and matches what people already anticipate, which quietly reduces friction. Assigning pink to your billing department, on the other hand, will not confuse anyone, because there is no widespread expectation to violate. Reserve your deliberate, distinctive color for the role you most want patients to identify on sight, and let the rest follow convention or convenience.

    How many colors your practice actually needs

    The most common mistake in scrub programs is buying too many colors, not too few. Every additional color multiplies the sizing runs you have to stock, the reorder lines you have to manage, and the odds that someone shows up in the wrong shade. The right number of colors is driven by how many roles a patient or coworker genuinely needs to tell apart at a glance, not by how many look nice on a mood board.

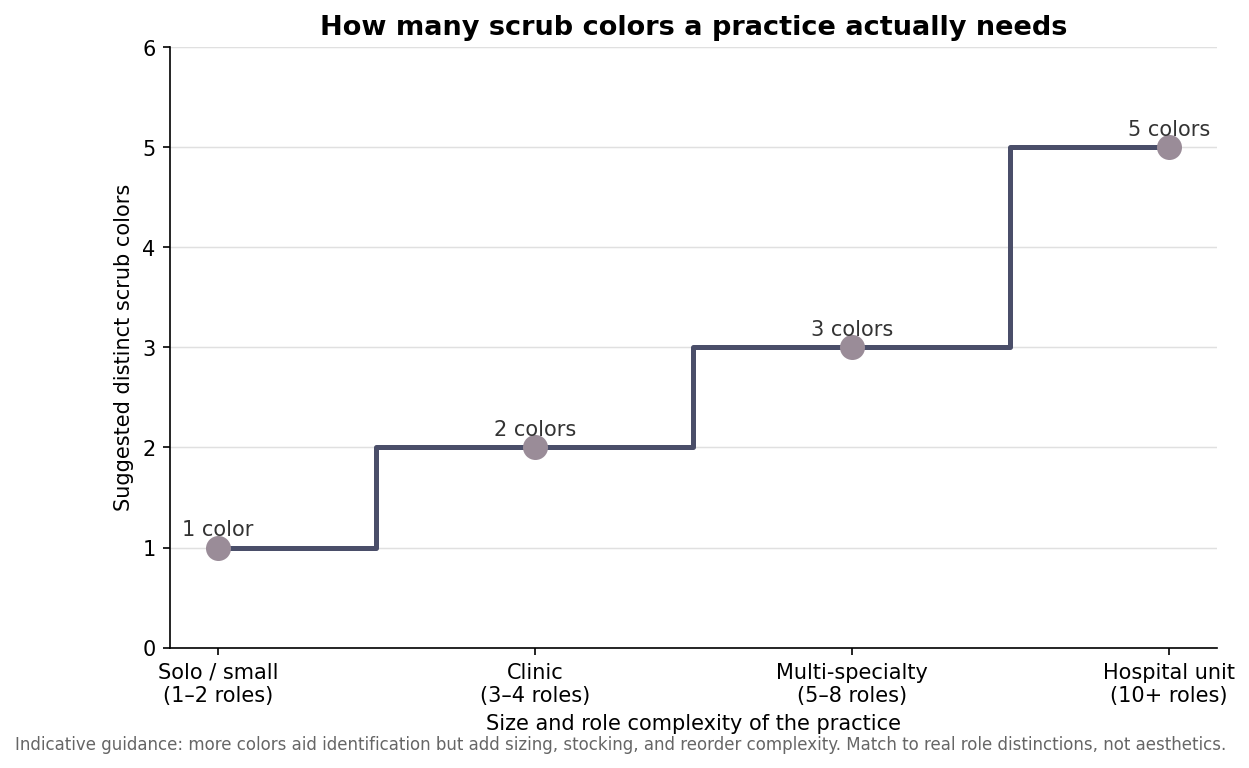
    Step chart showing suggested number of scrub colors rising from one for a solo practice to five for a large hospital unit
    Suggested number of scrub colors as a practice grows in size and role complexity.

    A solo practitioner or a small front-desk-plus-provider office rarely needs more than one color; the branding lives in the embroidery, not in a color-coding system nobody is trying to read. A mid-sized clinic with clinical and support staff benefits from two, maybe three, colors that separate the groups patients interact with differently. Only large, multi-role environments justify five or more color tiers, and even there the discipline is to map each color to a real, patient-facing distinction. When in doubt, use fewer colors and let name and role embroidery carry the finer detail. A tight palette is also cheaper to run, easier to reorder, and far more forgiving when a team grows or reshuffles, because you are not locked into a color scheme built around roles that no longer exist.

    Making the policy survive contact with reality

    A color policy is only as good as its consistency over time, and this is where custom programs quietly go wrong. Dye lots drift, so the “navy” you order this year may not perfectly match the navy from eighteen months ago; ordering a full size run at once, and specifying the same fabric and color name on reorders, keeps a team looking uniform rather than mottled. It also pays to hold a small buffer of common sizes so a new hire is not stuck in the wrong color for weeks waiting on a reorder.

    Embroidery contrast is the other detail that makes or breaks the look. A logo has to be legible against the garment, which means a dark thread on light scrubs and a light or metallic thread on dark ones; a navy logo on black scrubs disappears at three feet. Decide your thread colors per garment color up front, and confirm them on a physical sample before committing the full order. The same goes for logo placement, which should be consistent across every color so the program reads as one uniform and not a collection of individual choices.

    Write it down and keep it short

    The final step is the cheapest and the most skipped: put the policy in writing. A single page that states which role wears which color, where the logo sits, what thread color pairs with each garment, and how to reorder will outlast any individual manager and keep the program coherent as the team turns over. Color is the part of a scrub program that does the most communicating and gets the least planning. Give it a deliberate structure, keep the palette tight, and the uniforms will do their quiet job of telling everyone, at a glance, exactly who is who.

  • A Practice Manager’s Guide to Scrub Program Economics — Custom Scrubs Co

    Call or Text us: (929) 605-4397

    HomeBlog › A Practice Manager's Guide to Scrub Program Economics

    Economics

    A Practice Manager’s Guide to Scrub Program Economics

    06/30/2026

    A scrub program is a real line item, and practice managers are right to ask whether it pencils out. The honest answer is that it does — not just in appearance, but in staff retention, reduced turnover costs, and fewer ad-hoc uniform purchases over time.

    Here is how to think about the numbers.

    Per-unit cost vs. total program cost

    Bulk pricing on embroidered scrubs typically runs from about $16 to $34 per unit at minimum order quantities, improving as volume increases. A 30-person practice ordering two sets per staff member is a modest, predictable annual line item once you compare it against replacing worn-out, non-branded scrubs staff buy on their own.

    The hidden cost of a non-uniform team

    Practices without a formal scrub program often end up with staff in a mismatched assortment of colors and styles, purchased individually with no consistency and no logo. That looks disorganized to patients and, less visibly, removes an easy, low-cost piece of your brand marketing that a uniform program provides for free every single day.

    Budgeting for turnover and growth

    Because we keep your embroidery file and sizing on record, replacing scrubs for new hires is a small, predictable reorder rather than a new design project each time — keep a modest annual line item for this rather than treating your first order as a one-time expense.

    Line itemTypical range
    Per-unit cost at MOQ (24 units)$16–$34
    Cost per staff member (2 sets)Roughly double the per-unit range
    Reorder cost per new hireSimilar per-unit range, faster turnaround
    Key takeawayBudget a scrub program as an ongoing, modest line item rather than a one-time expense — the branding and consistency benefit compounds every time a patient sees your team.

    Ready to build your program’s budget? Get a custom quote — free mockups in 24–48 hours. Learn more about how we work, or browse more guides.

    More posts

  • How to Order Custom Scrubs for Your Practice: A Sizing & Ordering Checklist — Custom Scrubs Co

    Call or Text us: (929) 605-4397

    HomeBlog › How to Order Custom Scrubs for Your Practice: A Sizing & Ordering Checklist

    Ordering

    How to Order Custom Scrubs for Your Practice: A Sizing & Ordering Checklist

    05/26/2026

    A first bulk scrub order can feel more complicated than it needs to be — sizes, colors, logo placement, and a headcount that always seems to change between the quote and the final order. This checklist covers what to gather before you request a quote.

    Working through these five items up front makes the whole process faster.

    1. Get real sizes, not guesses

    Ask staff to check their own size against a standard scrub size chart rather than guessing from a t-shirt size — scrub fits run differently across brands and styles, and a wrong guess means a slower reorder later.

    2. Decide on one style, or a small set of styles

    Most practices do best standardizing on one or two styles — say, a Scrub Top for everyone and a Lab-Coat Style Scrub Jacket for providers — rather than letting every department choose independently.

    3. Lock your logo file and colors early

    Send your logo as a vector file if you have one; if not, we’ll recreate it embroidery-ready at no charge. Decide on a primary color and, if needed, a secondary color for a sleeve or department mark.

    4. Build in a buffer for growth

    Order a few extra sets in common sizes beyond your exact current headcount, so a new hire can be outfitted immediately without waiting on a small reorder.

    5. Confirm your timeline against your onboarding calendar

    Standard production runs about two to three weeks after mockup approval — plan your order date against any known onboarding or launch dates, and ask about rush options if timing is tight.

    StepWhat to gather
    1. SizesActual scrub sizes per staff member, not t-shirt sizes
    2. StylesOne or two standardized styles per role
    3. ArtworkLogo file (vector preferred) and brand colors
    4. BufferA few extra sets in common sizes for new hires
    5. TimelineOrder date checked against onboarding deadlines
    Key takeawayGathering accurate sizes, a locked logo file, and a realistic timeline before you request a quote is the single biggest factor in a smooth first order.

    Ready to place your first order? Get a custom quote — free mockups in 24–48 hours. Learn more about how we work, or browse more guides.

    More posts

  • Embroidered vs. Screen-Printed Scrubs: Durability Compared — Custom Scrubs Co

    Call or Text us: (929) 605-4397

    HomeBlog › Embroidered vs. Screen-Printed Scrubs: Durability Compared

    Buyer guides

    Embroidered vs. Screen-Printed Scrubs: Durability Compared

    05/08/2026

    Practices sometimes come to us after a screen-printed or heat-transferred scrub logo has cracked, faded, or peeled within months of ordering. It is one of the most common reasons a practice switches suppliers. Here is why embroidery holds up where printing doesn’t.

    The difference comes down to how each method attaches to the fabric.

    How screen printing and heat transfer fail

    Both methods sit a layer of ink or vinyl on top of the fabric surface. Under the hot-water washing and high-heat drying that clinical laundering requires, that surface layer flexes, cracks, and eventually peels — often within 20 to 40 wash cycles, well inside a single year of daily use.

    Why embroidery holds up longer

    Embroidery stitches thread directly through the fabric, so there is no surface layer to crack or peel. The logo ages the way the rest of the garment ages — a slow, even fade in color rather than a sudden, visible failure. Most embroidered logos remain fully legible and intact well past 100 wash cycles.

    Cost and appearance tradeoffs

    Screen printing is typically cheaper for large, full-color designs, and embroidery has a natural limit on very fine detail. For a practice logo — generally a simple mark plus text — embroidery is both more durable and, in our experience, reads as more premium on a uniform.

    MethodTypical wash-cycle durabilityBest for
    Screen print / heat transfer20–40 cycles before visible wearLarge full-color graphics, lower budget
    Embroidery100+ cycles with minimal visible wearPractice logos, name embroidery, long-term uniform programs
    Key takeawayFor a uniform program meant to last years, embroidery outlasts printed or heat-transferred logos by a wide margin.

    Ready to switch to embroidery? Get a custom quote — free mockups in 24–48 hours. Learn more about how we work, or browse more guides.

    More posts

  • Which Teams Need Embroidered Scrubs? A Buyer’s Guide by Practice Type — Custom Scrubs Co

    Call or Text us: (929) 605-4397

    HomeBlog › Which Teams Need Embroidered Scrubs? A Buyer's Guide by Practice Type

    Buyer guides

    Which Teams Need Embroidered Scrubs? A Buyer’s Guide by Practice Type

    04/19/2026

    Not every practice needs the same scrub program. A six-person dental office and a multi-site health system are solving different problems, even though both benefit from embroidered, branded scrubs. Here is how the audience typically shapes the order.

    Use this as a starting point, then adjust for your team’s size and roles.

    Medical & dental practices

    Smaller practices generally standardize on one or two colors across the whole staff, using the Scrub Top or Scrub Pant Set for most roles and reserving a Lab-Coat Style Scrub Jacket for providers.

    Veterinary clinics

    Veterinary teams are physically active and often work around fur, water, and mess, so performance stretch fabric and a durable, easy-care Scrub Pant Set tend to be the default here.

    Med spas & aesthetics clinics

    Client-facing aesthetics teams often lean into the Womens Fit Scrub Set for a more polished, boutique-appropriate silhouette that matches a higher-end client experience.

    Hospitals & health systems

    Larger systems frequently color-code scrubs by department or role, ordering the Mens and Womens Fit Scrub Sets together at scale, with a shared embroidery file that keeps every location consistent.

    Practice typeTypical default styleTypical fabric
    Medical & dental practicesScrub Top / Pant SetPoly-cotton blend
    Veterinary clinicsScrub Pant SetPerformance stretch
    Med spas & aesthetics clinicsWomens Fit Scrub SetPerformance stretch
    Hospitals & health systemsMens & Womens Fit SetsEither, by department
    Key takeawayLet your team’s daily activity level and client-facing role — not just budget — guide which scrub style and fabric you standardize on.

    Not sure which style fits your team? Get a custom quote — free mockups in 24–48 hours. Learn more about how we work, or browse more guides.

    More posts

  • Poly-Cotton vs. Performance Stretch Scrub Fabric: Which to Choose — Custom Scrubs Co

    Call or Text us: (929) 605-4397

    HomeBlog › Poly-Cotton vs. Performance Stretch Scrub Fabric: Which to Choose

    Fabric

    Poly-Cotton vs. Performance Stretch Scrub Fabric: Which to Choose

    04/01/2026

    Nearly every practice ordering scrubs for the first time asks the same question: poly-cotton or performance stretch? Both are good, durable choices, and the right answer depends more on how your staff moves through a shift than on price.

    Here is how the two fabrics actually compare in daily use.

    Poly-cotton: the reliable workhorse

    A poly-cotton blend is the traditional scrub fabric — breathable, easy to launder at high heat, and the most cost-effective option at volume. It holds embroidery cleanly and resists shrinking, making it a dependable default for front-desk staff, administrative teams, and any role that isn’t constantly bending or reaching.

    Performance stretch: built for movement

    Four-way performance stretch fabric moves with the body, which matters for clinical staff who are reaching, bending, and standing for long stretches. It also tends to hold a more tailored, put-together silhouette, which is why med spas and aesthetics clinics often choose it for client-facing roles.

    Durability and embroidery hold

    Both fabrics take embroidery well and hold up to hospital-grade laundering, though performance stretch fabric is engineered specifically to recover its shape wash after wash, which can extend a garment’s useful life for high-activity roles.

    FabricBest forRelative cost
    Poly-cotton blendFront desk, admin, lower-activity rolesLower
    Performance stretchClinical staff, high-movement roles, client-facing fitModerate
    Key takeawayChoose poly-cotton for cost-efficient, easy-care basics, and performance stretch for roles that need mobility and a more tailored fit.

    Ready to choose your fabric? Get a custom quote — free mockups in 24–48 hours. Learn more about how we work, or browse more guides.

    More posts

  • Custom Embroidered Scrubs for Medical & Dental Practices — Custom Scrubs Co

    Call or Text us: (929) 605-4397

    HomeBlog › Custom Embroidered Scrubs for Medical & Dental Practices

    Practices

    Custom Embroidered Scrubs for Medical & Dental Practices

    03/15/2026

    Walk into a well-run practice and one of the first things you notice, often without thinking about it, is that the staff looks like a team. Matching, embroidered scrubs are a small detail that does a lot of quiet work — they signal organization to a nervous patient, make it easy to identify staff roles at a glance, and reinforce the practice’s brand every single day.

    Here is how medical and dental practices typically build a scrub program that pays for itself in that first impression.

    Start with the front-of-house team

    Front desk and reception staff are the first people a patient sees, so a consistent, embroidered look there sets the tone before a patient even reaches an exam room. Many practices start their scrub program here, ordering Scrub Tops or a matched Scrub Pant Set in the practice’s primary color with the practice logo at the chest.

    Differentiate clinical roles without overcomplicating it

    Hygienists, assistants, and providers often wear a different color or a different piece — a Lab-Coat Style Scrub Jacket layered over a standard set is a common way to visually distinguish a dentist or physician from support staff without building an elaborate tiered uniform system.

    Plan for growth and turnover

    Practices grow, and staff turns over. Because we keep every practice’s embroidery file and size specs on record, reordering a single Scrub Top for a new hire six months later takes a phone call, not a redesign.

    RoleTypical styleTypical color
    Front deskScrub Top or Pant SetPractice primary color
    Hygienists / assistantsWomens or Mens Fit Scrub SetPractice primary or secondary color
    ProvidersLab-Coat Style Scrub Jacket over a setPractice primary color, contrast trim
    Key takeawayA scrub program built in layers — a base set for everyone, a jacket for providers — gives a practice visual consistency and role clarity without unnecessary complexity.

    Ready to outfit your practice? Get a custom quote — free mockups in 24–48 hours. Learn more about how we work, or browse more guides.

    More posts